Note this Solid Know-How™ article does not apply to Solid Route Accounting™ for QuickBooks Online; please refer to Article #335 How to Create Customer Route Groups?
For mobile sales, it is usually desirable to separate your customer records into Customer Route Groups (CRG). This allows the upload of customers specific to that mobile route. To do this, Solid Route Accounting™ requires that your customers be assigned to a CRG. You may establish just one or as many Customer Route Groups as you wish.

All supported business systems can have a CRG value added to the customer record, which is subsequently used to load information specific to those customers assigned to a mobile.
Please note that a customer or CRG can be assigned to multiple mobile computers.
Setting up CRGs is a 3 step process:
- In your Accounting System: In your accounting/ERP system, assign a CRG value to the customer record. See QuickBooks® specific instructions below as an example.
- In SolidRouteAccounting.com: update the settings as shown below.
- In Solid Fusion™ (located on your office computer): Click on "Sync Now". Remember, you do not have to use "Sync Now" if you allow Solid Fusion™ to run automatically.
Step 1 – Accounting System Setup: QuickBooks®
In QuickBooks® to add a CRG to your customer records, you must set up a Custom Field for your customers:
- Select the Customer button in the Customer Navigator window.
- Create a new customer or double click on an existing customer
- Click on the Additional Info tab.
- Click Define Fields.
- Enter "Route Group" as the name of the field in the label column.
- Put a checkmark on the Customers options, then click on OK.
- Note that Define Fields needs to be done only once, on an initial basis.
- Proceed with inputting a CRG for each customer record you wish to send to a mobile sales unit. The CRG value generally consists of 3 digits/characters, e.g. 001 or C10.
- Run Solid Fusion™ so that your changes are uploaded to Solid Route Accounting™ and made available for the next step.
Step 2 – Configure SolidRouteAccounting.com
Next, log into SolidRouteAccounting.com:
- Select the Settings tab
-
For the "Route Group Field", select the newly created QuickBooks® custom field from the drop-down list.

- Click on [Save]
Now on your office computer, open Solid Fusion™ and click on [Sync Now] to import the route group data from QuickBooks®.
Step 3 – Final Configuration of SolidRouteAccounting.com
Returning to SolidRouteAccounting.com
- Navigate to the Mobiles tab
- Select a mobile record, and click [Edit]
-
Check the Customer Route Groups that you would like to be assigned to this mobile
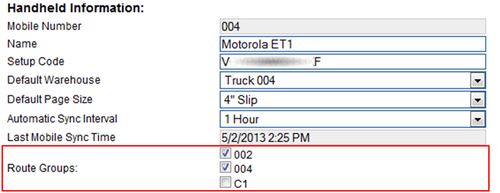
- Click [Save]
The last step is to synchronize your mobile(s) for these changes to take effect.
For a step-by-step guide on how to setup CRG in Solid Business Central™, please read the following Solid Know How™ article:
Article #86 What are Customer Route Groups (CRG) and how to Use, Create, and Assign Them?